Are you ready to learn some amazingly game-changing Canva design tips? These Canva tips and tricks save us so much time and help make designing in Canva easier than ever.
Want a FREE, no-fluff crash course on using Canva as a blogger? Enroll in our self-paced Canva 2.0 Quick Start NOW!
Canva can be an amazing design tool for any online business owner.
However, when we first started using Canva, we felt really limited. Making ONE simple line was a challenge. Curved text? Don’t even think about it.
Over the years, we’ve come up with tons of Canva design tips, and since then, we’ve been able to create everything from full workbooks, journals, course slide decks, and SO much more using this one tool.
No more feelings of limitations. It just takes a little creative thinking!
We have a fantastic audience of people who LOVE chatting about Canva design tips and a great community of bloggers invested in mastering their design skills.
The benefit of this is that we know when there’s a common denominator regarding Canva. This is incredible feedback for Canva’s design team and great for blog posts that help YOU in the NOW.
So today, we’ll be chatting about the latter, the most COMMON Canva design questions.
Canva design tips to make the program even easier to use and more versatile for bloggers. Heck yes!
Table of Contents
- 1 TRICK #1: COPY AND PASTE
- 2 TRICK #2: HOW TO MERGE CANVA DESIGNS
- 3 TRICK #3: DOWNLOAD JUST ONE PAGE
- 4 TRICK #4: SELECTING AN OBJECT BEHIND ANOTHER OBJECT WITHOUT MOVING IT OUT OF THE WAY
- 5 TRICK #5: MOVING OBJECTS JUST A TEENY TINY BIT
- 6 TRICK #6: ADDING A SHADOW TO AN IMAGE
- 7 TRICK #7: CREATE A PROJECT WITH MORE THAN 300 PAGES
- 8 There are so many simple Canva design tips & tricks!
- 9 RESOURCES MENTIONED IN THIS POST:
TRICK #1: COPY AND PASTE
This is hands down the most common question we get: “How do you copy and paste in Canva?”
Copy and paste is the single most often used keyboard shortcut in our bag of Canva design tips.
Seriously! We use it ALL THE TIME, making our lives so much easier.
REMEMBER THIS POST LATER! PIN IT TO YOUR FAVORITE PINTEREST BOARD!⬇
We often have multiple tabs on our browser and copy and paste from tab to tab. This helps us save time and stay consistent with our designs.
Related Post: How to Brand Your Blog + Achieve Brand Consistency
Not trying to go off-topic, but having a second monitor has been a total game-changer.
Returning to the question, “How do you copy and paste in Canva?” It’s super simple!
First, click off to the side and drag your mouse over whatever you want to copy. After it’s highlighted, click Ctrl+C (PC) or Cmd+C (Mac) to copy your design.
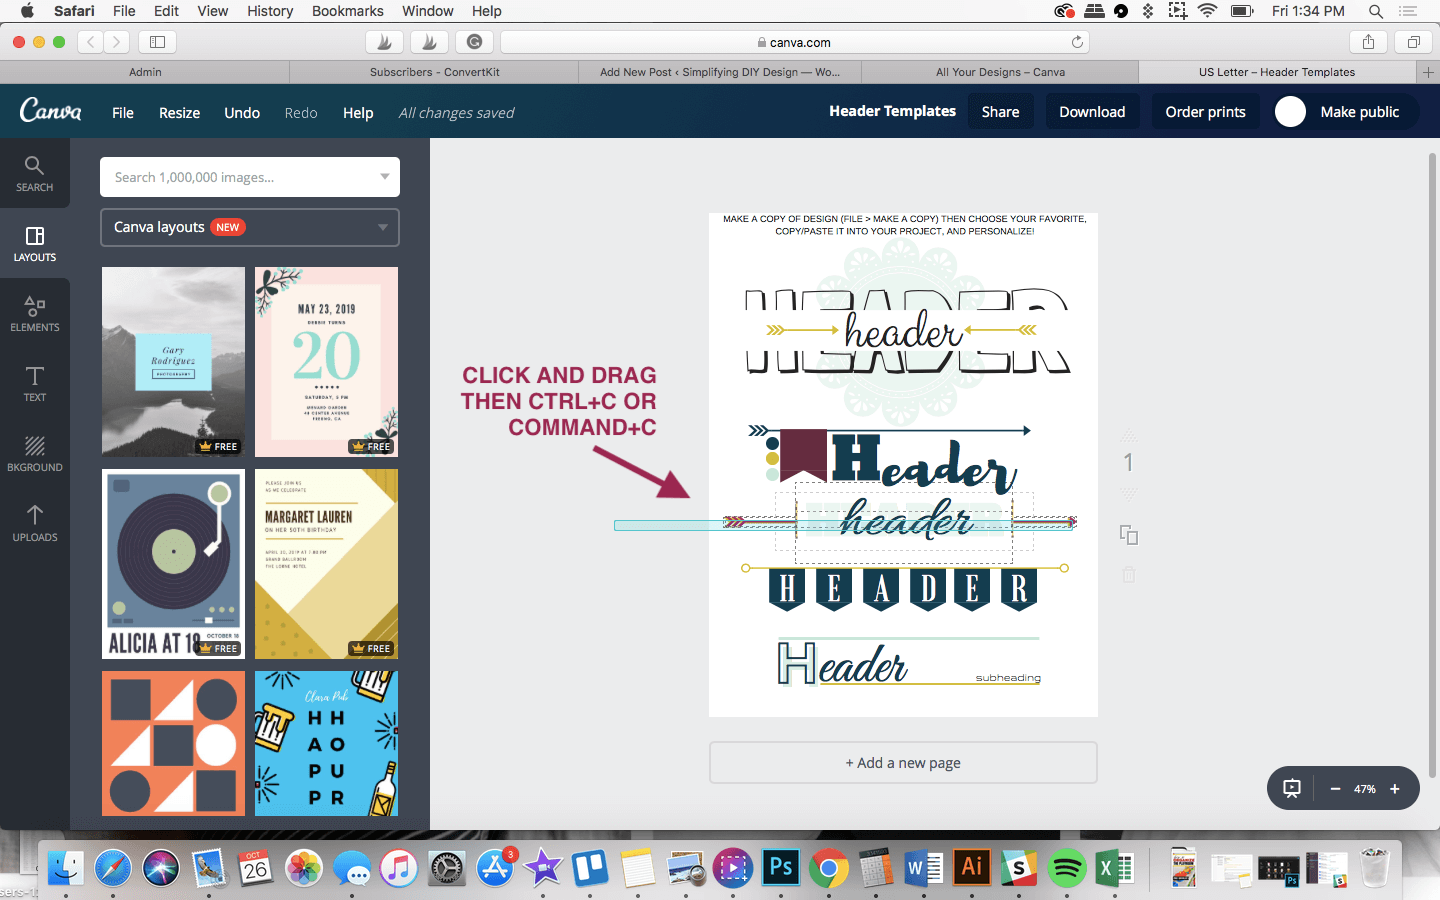
NOTE: If you accidentally select more objects than you meant to, hold the Shift key down and CLICK on anything you want to de-select. Then, Ctrl/Cmd+C to copy.
Next, open the project you want to paste this into.
You can also paste it into the same project (on the same or different pages).
We often do this when creating a workbook to keep the border, layout, and headers consistent. This also helps us design much faster.
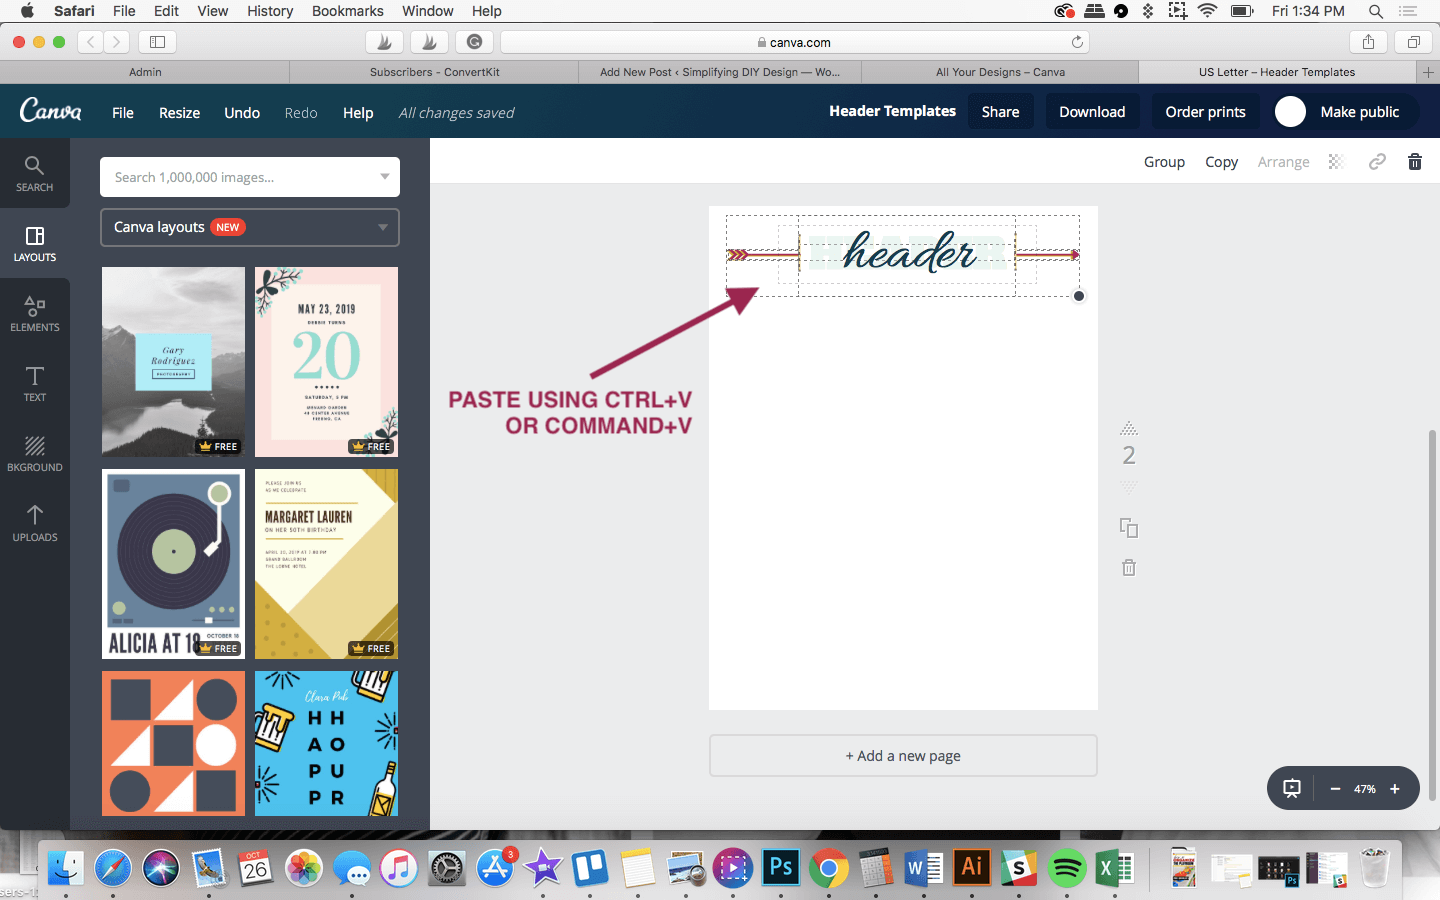
To paste, use your keyboard shortcuts again, using Ctrl+V (PC) or Cmd+V (Mac).
Super simple, right?
If you don’t want to use keyboard shortcuts, you can also right-click your mouse to open a menu with copy-and-paste options.
TRICK #2: HOW TO MERGE CANVA DESIGNS
Another question we get on the regular is how to merge Canva designs. There isn’t a trick to merging designs, but we have a similar solution!
To successfully merge Canva designs, you must view ALL your pages by clicking ‘Grid View’ from the lower righthand side of your project screen.
Next, click and drag your mouse over all the pages/designs you want to add to a different project. Click Ctrl+C (PC) or Cmd+C (Mac) to copy your highlighted design.
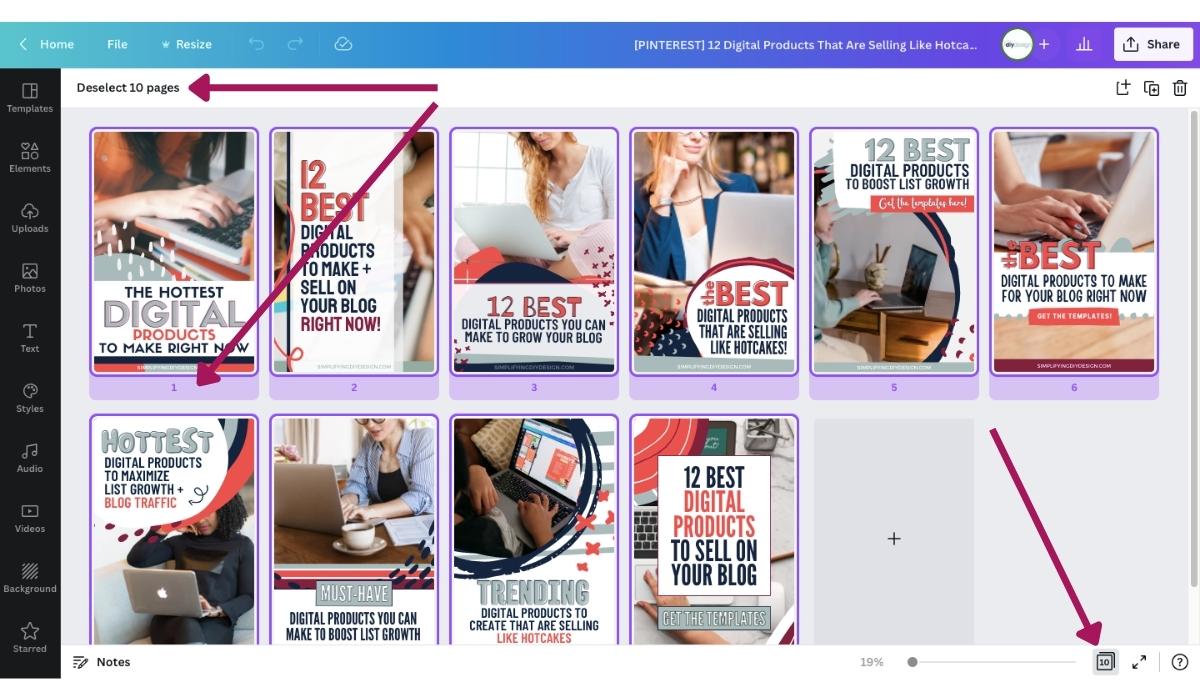
Head on over to your new project and add a blank page wherever you want to merge your copied designs. Select that page by clicking anywhere within it and then hit Ctrl+V (PC) or Cmd+V (Mac).
Canva will automatically push all other pages down to accompany every page you just pasted within in this new project.
Related Post: 5 Easy Ways to Merge Canva Designs
While this doesn’t quite answer how to merge Canva designs, it’s still a great addition to your bank of Canva design tips!
TRICK #3: DOWNLOAD JUST ONE PAGE
What’s interesting is that we get this question the most during Q3. (From all those early Q4 preppers!)
Our readers want to design all the product mockups for Pinterest, social media, and more to fully leverage Q4 traffic and sales.
Sharing the cover image from your blog printable or digital product in a mockup converts really well. It’s something tangible to where they see and know what they’re getting instead of an assumption.
Related Post: Designing in Canva | Anatomy of a Killer Blog Printable
Once they download the cover page of their digital product (let’s say a workbook), they can:
- Re-upload it into Canva and add it to a Pinterest pin
- Add it to a social media/sales page image
- Upload it to a cover mockup generator like myecovermaker.com
Either way, this is another really easy Canva design trick! Look to the left of the page you want to download to find the ‘Page Number.’

Once you find that number, click ‘Share,’ ‘Download,’ and the ‘Select pages’ dropdown.
Deselect ‘All pages (1-XX)’ and select the page number you want to download.
TRICK #4: SELECTING AN OBJECT BEHIND ANOTHER OBJECT WITHOUT MOVING IT OUT OF THE WAY
This trick is shown in the video at the top of this post at timestamp 02:46.
This one is a game-changer for SO many people, including us! Have you ever tried to click on something, and there’s a text box or object in the way, and you end up clicking the wrong thing?
Related Post: Canva Shortcuts That Will Help You Design Faster
Yeah, you’re not alone.
It’s such a time suck and can make designing in Canva just a tad bit frustrating.
There’s a super simple trick for this, and it’s one of the many tricks we cover in our Confidently Canva course (get $20 OFF through this link!), but we’ll let you in on it here…
Use the Command key! (or Ctrl key for PC users)
Here’s what you’re going to do if another object is selected.
- Hold down the Command (or Ctrl) key
- Click again (WHILE holding that key)
This will select the object that’s behind the first object.
If the object you’re trying to select is way in the back, you might have to keep holding Command (or Ctrl) and clicking.
Each time you click while holding that key, it will select the next object in the back.
Did we blow your mind?
TRICK #5: MOVING OBJECTS JUST A TEENY TINY BIT
This trick is shown in the video at the top of this post at timestamp 08:16.
We get this question a lot regarding positioning text just right so that it’s perfectly lined up.
Sometimes, it’s difficult to get the text boxes right when you move them around with your mouse.
But, if you click just outside of the text box, you’ll notice that there’s a little cross arrow that looks like this:
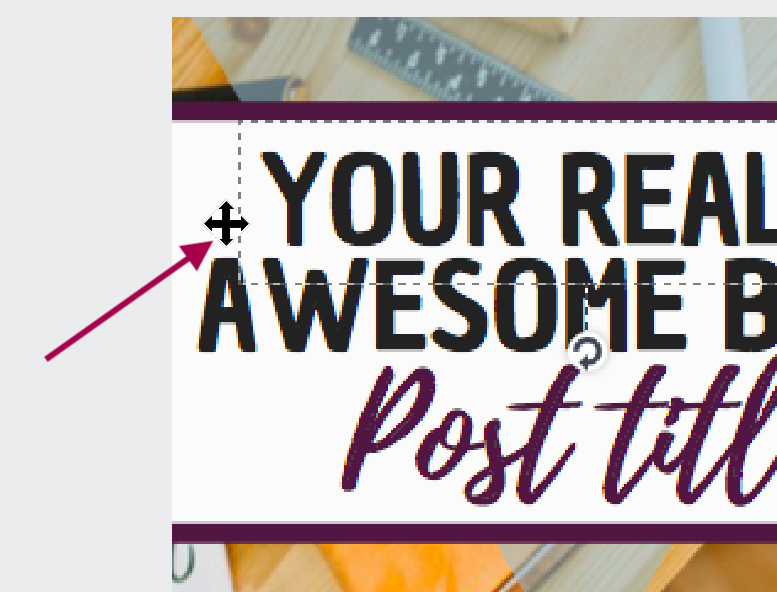
When that symbol appears, click again. You’ll know it worked because you won’t be able to type in that text box anymore.
NOTE: This is only necessary when trying to move a text box. You only need to click once if you want to move a shape or other object.
Finally, use the arrow keys on your keyboard to move the object to just 1px. It’s effortless to get it lined up just right doing it this way!
You can also hold down the Shift key and use the Arrow keys if you want to move the object 10px.
This is probably one of our favorite Canva design tips because it lets us be precise with our movements!
TRICK #6: ADDING A SHADOW TO AN IMAGE
This was a requested feature among our audience, so we created actual shadow jpegs to use.
Even though they were a bit bulky and only worked on perfectly square and rectangular images, they made their product mockups POP!
Fortunately, we can leave all that behind now that Canva has finally added the ‘Shadow’ feature to their bag of Canva design tips.
And it works for all images, stock photos included!
First, you’ll add whatever image you want to use. If it’s not already cut out, you can use pixlr.com, remove.bg, or one of the many online sources for removing backgrounds.
CANVA PRO USERS: If you have Canva Pro, use their ‘Background Remover’ from the ‘Edit Image’ dropdown.
Click ‘Edit Image’ from the top left menu and select ‘Shadows.’
Canva tests out numerous layouts at any time, so you may have to scroll down a bit. Then, choose the shadow you’d like to apply.
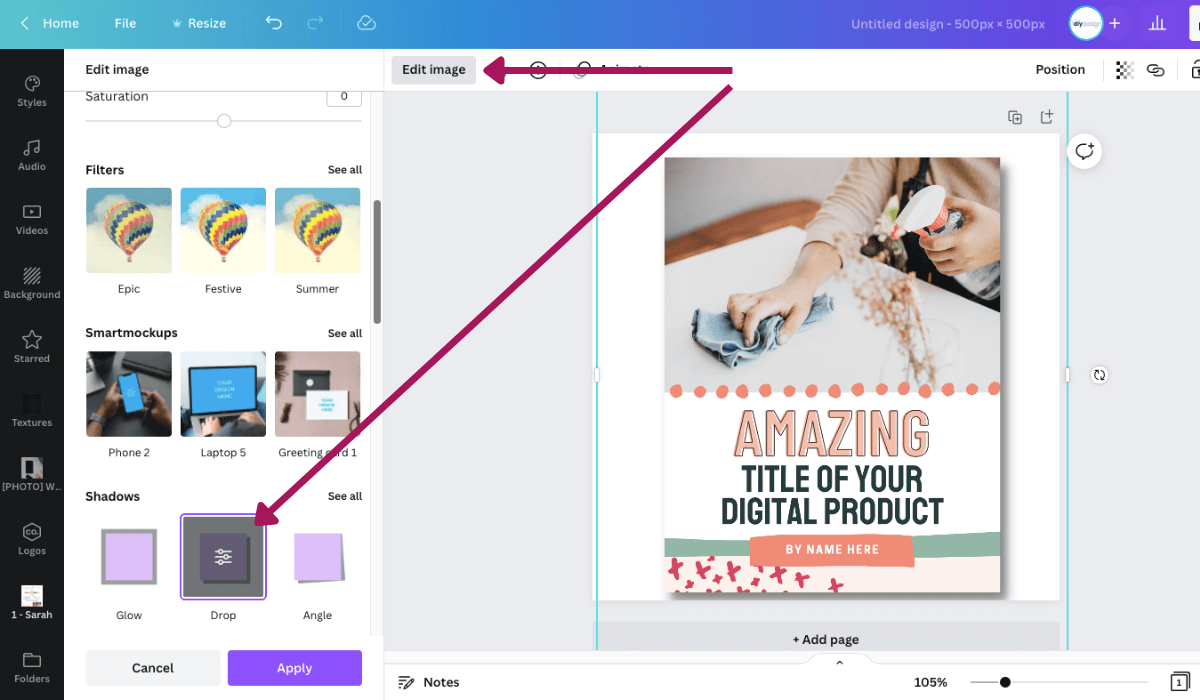
Click on the ‘Shadow’ button again to open more options, such as ‘Size,’ ‘Transparency,’ etc.
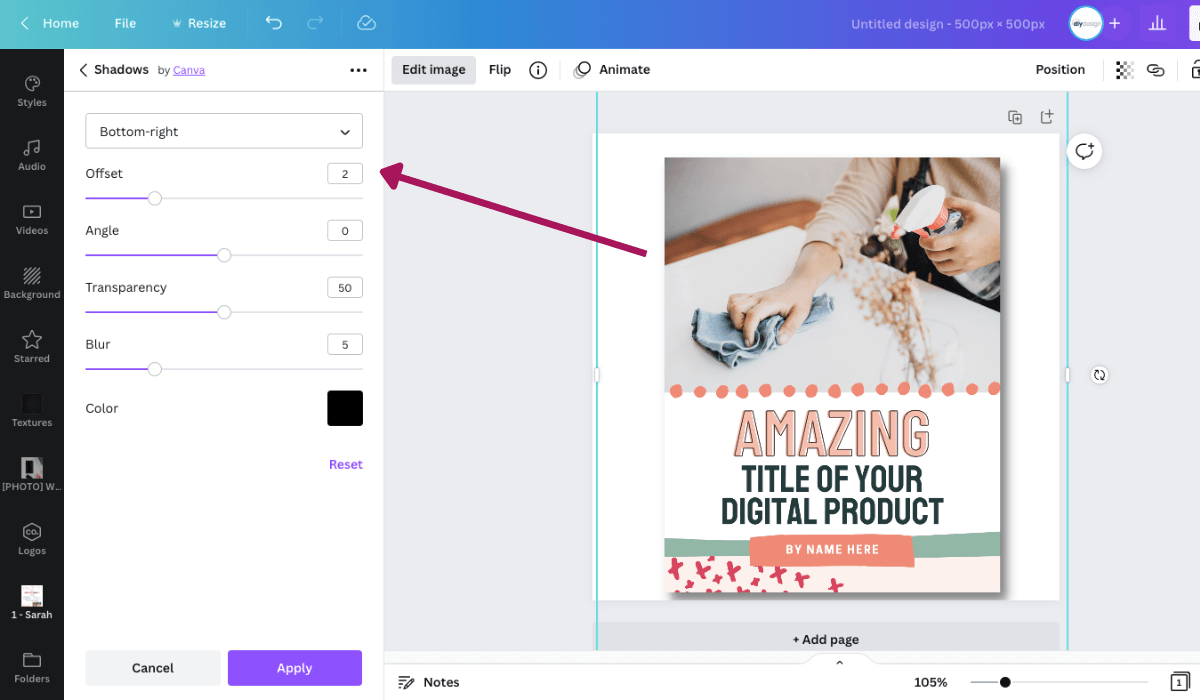
Follow this same method if you want to give a cover design or printable a shadow (we recommend it!).
Related Post: Best Features for Editing Design Templates In Canva
You’ll find more really cool editing tricks to cut down your design time and make you feel like a graphic design pro!
TRICK #7: CREATE A PROJECT WITH MORE THAN 300 PAGES
We can’t even describe the level of happiness we felt when Canva finally announced its new page limit of 300 pages!
After sharing this achievement with our community, we immediately opened this post to add to our list of Canva design tips!
Being limited to just 30 pages was a headache for clients and us. Sheesh!
What if your project exceeds 300 pages?
First, don’t panic! Start a new project, use the copy and paste method mentioned above to copy your layout for consistency, and keep going.
Related Post: The Easy Way to Create and Sell Printable Products
As Mac users, we use ‘Preview’ to merge our pages. (Don’t worry, we’ll talk about PC users in a minute!)
Open each document in Preview. If you don’t already see the thumbnail views on the side, go to ‘View’ and select ‘Thumbnails.’

Next, drag and drop the pages you want to add from the second document into the first one.
DESIGN TIP: To select multiple pages, click on the first one, hold Shift, and then click on the second.
This will select all the pages in between, and you can drag and drop them all at once.
You can also reorder pages by dragging and dropping the thumbnails in the order you want.
For PC users, there is this nifty free online tool called ilovepdf.com.
You do NOT have to download anything to your computer; it is 100% free. Upload both of your documents and choose the ‘Merge PDF’ option.
Related Post: The Easy Way to Create an Editable Printable for Your Readers
SIDE NOTE: We often use ilovepdf to turn uneditable PDFs from courses into Word documents so that we can type right in the document.
There are so many simple Canva design tips & tricks!
Wondering how to resize in Canva? We wanted to add it here, but it deserved its own post since we cover 3 quick and easy ways to resize in Canva.
We love figuring out these little Canva design tips and hacks. There are so many more that we could literally spend all day doing this!
Instead, we created our COMPLETE Canva course, Confidently Canva! It’s an in-depth course that teaches you ALL the Canva design tips and tricks in easy-to-follow video lessons.
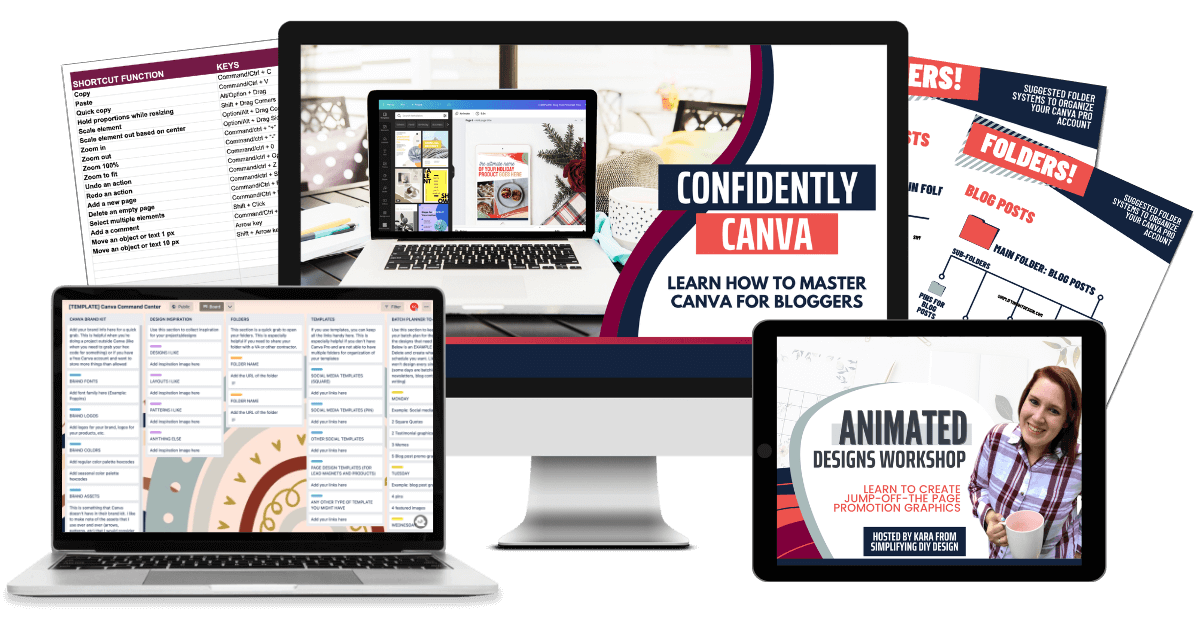
Plus, you’ll learn how to design social media graphics and printables. Enroll in Confidently Canva NOW to get $20 OFF!
Canva is always adding incredible features to help its users design faster. Seriously, we can barely keep up with all of the updates!
What features would you love to see in Canva? Let us know in the comments below!
RESOURCES MENTIONED IN THIS POST:
- How to Brand Your Blog + Achieve Brand Consistency
- Designing in Canva | Anatomy of a Killer Blog Printable
- Canva Shortcuts That Will Help You Design Faster
- Best Features for Editing Design Templates In Canva
- The Easy Way to Create and Sell Printable Products
- 3 Quick and Easy Ways to Resize in Canva
Don’t forget to enroll in our FREE no-fluff crash course, Canva 2.0 Quick Start! It’s great for beginner bloggers who want to learn more about the best design tool on the market!
TRY CANVA PRO FREE FOR 30 DAYS
Start your FREE Canva Pro trial today and unlock ALL of its incredible time-saving features that’ll cut your design time to just minutes.
To be honest? It’s the best $14.99/mo OR $119/yr we spend on our business because that time we save with every design is put back into making MORE money in our business!
WANT TO SAVE THIS FOR LATER? PIN IT TO YOUR FAVORITE PINTEREST BOARD!⬇

Christin says
I have been using Canva for Pinterest and these are some great tips. Thank you!
Sarah Black says
We’re so happy you found our tips useful, Christin. Canva is pretty awesome, if we do say so ourselves!
ClaireAnne Katherine Collins says
Thanks for the info, excited to read more!!!
Sorry that is my ebay website I added, I don’t have a particular one yet..
karafidd says
If you’re referring to something that shows up automatically on every single page then unfortunately no. However, when you copy and paste between pages, whatever you paste will show up in the same spot so if you add a footnote to the first page, you can then copy and paste the same thing on every page after that pretty quickly and it should show up in the same spot that you had it on the first page.
Alifyah says
My reaction to your shadow hack: OHHH MY GODDDDDD!!!!!! WOWWW!!!
Lee says
I already have a large, formatted document that I want to paste into Canva. However, when I create a text box and paste the document, Canva does not create new pages for the text to flow onto. It just makes a big text box that overlays everything else!
How can I paste my document without continually 1) adding a new page 2) copying only enough verbiage to fit one page and 3) pasting each separate page 4) repeating the same steps?
karafidd says
Unfortunately, there’s no way to do that in Canva. The quickest way I’ve found with Canva is to get my formatting down (text areas, headings, etc) then duplicate the page so I just have to copy and paste the text in and make it fit the page. If you were using a program like InDesign, you could create all your text boxes on all your pages then link them together, once they are linked you’d be able to copy and paste all the text at once and it would fill the project but you’d still need all the individual text boxes. Sorry I don’t have a better answer for you!
margherita says
Hi Kara, this is super helpful. Can I ask you how do you copy text from a word document onto a Canva text box? It does work with ctrl C ctrl V on a normal PC but it doesn’t work on my Mac with cmd C cmd V. Is it just me? 🙂
karafidd says
That’s super strange, I do it all the time on my mac using command+C and V — do you have any other keyboard shortcuts assigned to those keys that might be overriding it? I know I had a person who said the ctrl+click to move backwards wasn’t working for him but then it turned out he had a keyboard shortcut on his computer set for the ctrl key and it was overriding what it was supposed to be doing in Canva somehow. Also double check that you’ve already created a text box before trying to paste inside Canva. Hopefully one of those solutions will help!
Charlie says
Kara you are amazing and I love you. I just discovered your website and Canva tips, these are all SO helpful. I only wish I knew them sooner because they’re going to save me so much time!!
karafidd says
Aw thank you so much!! That is so awesome to hear!!! <3 <3
Kimberly says
These are great tips.! Thanks so much.
DaLorean says
Oh, this is good. This is really, REALLY good!
I needed this!
And yes, super annoying Canva got rid of the Copy and Paste between projects in the 2.0. I sent them a rating blasting them about this! Game changer for me as well. I may have to find something else if they don’t allow this! I don’t have time to remake things I’ve just spent time making!
karafidd says
I’m so glad you found this helpful! Also, 2.0 JUST added copy and paste!! Woohooooooooo!!!!
Sarah says
I cannot get my canvas to copy and paste between projects . What am I doing wrong?
karafidd says
Hey Sarah, are you trying to copy and paste from a Canva 1.0 design to a Canva 2.0 design?
Kristi Dee | Helping MOMpreneurs Master Productivity says
Kara, you always come through with at least one or more tricks I haven’t learned yet! Thanks so much for all your help.
karafidd says
Aw that’s so nice! Thank you!! I’m always happy to help <3