This article will show you how to convert any worksheet or printable you’ve designed into a fillable PDF! Editable PDFs are perfect for those who want to reduce their paper consumption and keep everything organized electronically.
Ready to grow your email list? Get our FREE Lead Magnet Template Pack! Create high-converting lead magnets AND promotional graphics for lightning-speed list growth!
Have you ever downloaded a workbook or even worksheet/printable and couldn’t edit it on your computer?
There were text boxes that couldn’t be typed in and checkboxes that couldn’t be checked.
The only way to make it work was to print it out!
Not everyone has a printer.
Not everyone has the money to keep buying ink cartridges that need replacing after just a few prints.
Not everyone wants a printout that can only be used once, not to mention those who are all about reducing their waste.
The thing is, ANY workbook, worksheet, printable, you name it can be converted into an editable format.
Most bloggers think they need fancy tools or Adobe Acrobat, which is just not true! (We actually believed this for a time, too.)
Now, we have a solution to create an editable PDF for FREE. The best part?
It’s incredibly fast and easy and can be done on a Mac and PC!
Table of Contents
WHAT IS AN EDITABLE PDF?
We have a lot of readers who are considering creating a printable in Canva and letting their readers edit it.
Unfortunately, there’s a major problem with this.
Depending on your audience, they may not know how to use Canva or have a Canva account. In fact, unless they’re a blogger or online business owner, chances are they have NO idea what Canva is!
We know how frustrating it can be to buy or even opt-in to something to find out we need to download an app or program to use said item.
We’ve even heard from others actually Googling ‘how to make a PDF editable’ so they could actually use what they just downloaded. So not user-friendly, right?
Creating a chore chart that requires someone to sign up for Canva just to add their kids’ names is not going to be very helpful.
We want your reader to click on the document, type in what they need to customize, and hit save or print. Quick wins are the name of the game!
So, how can we do that? We do this by converting our printable into an editable PDF.
PDFs can be created and opened on any computer, whether it’s a PC or Mac, making an editable PDF the perfect solution for both print and digital.
WANT TO REMEMBER THIS LATER? SAVE IT TO YOUR FAVORITE PINTEREST BOARD! ⬇
Before we get started, please note that this post is written with the intent that your printable is already created.
If you’re looking for a step-by-step guide on creating a killer printable for your blog, we’ve got you covered!
STEP 1: UPLOAD YOUR PDF
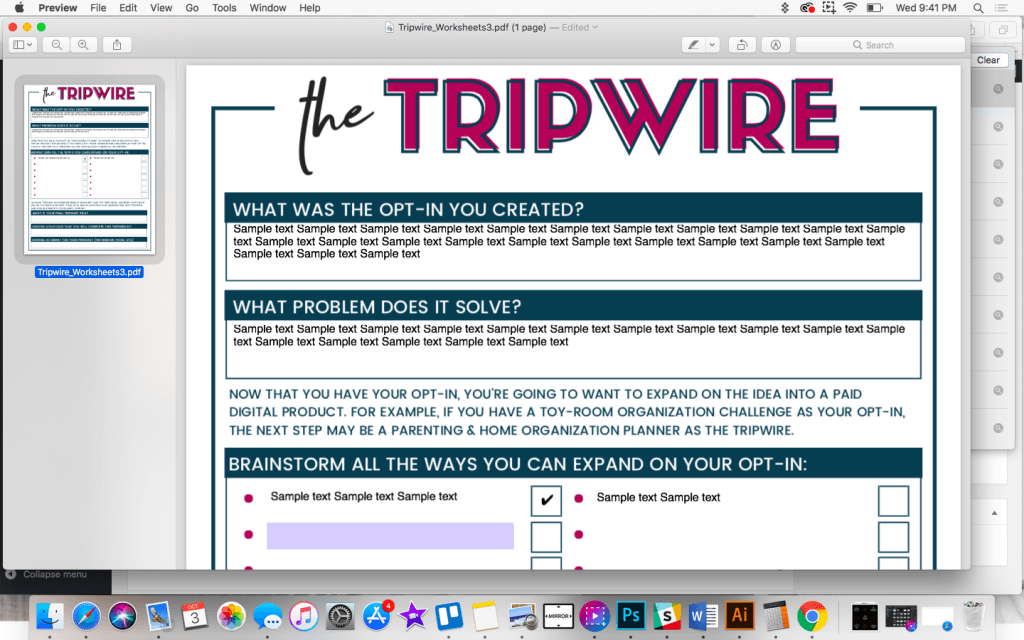
Once you have your printable created, you can download it as a PDF as usual. Leave any spots that your reader would edit or customize blank.
Reference the second image below for an example of blank space.
Next, you’re going to head over to PDFEscape.com.
This is a free online program. You don’t need to pay anything; you don’t even need to create an account.
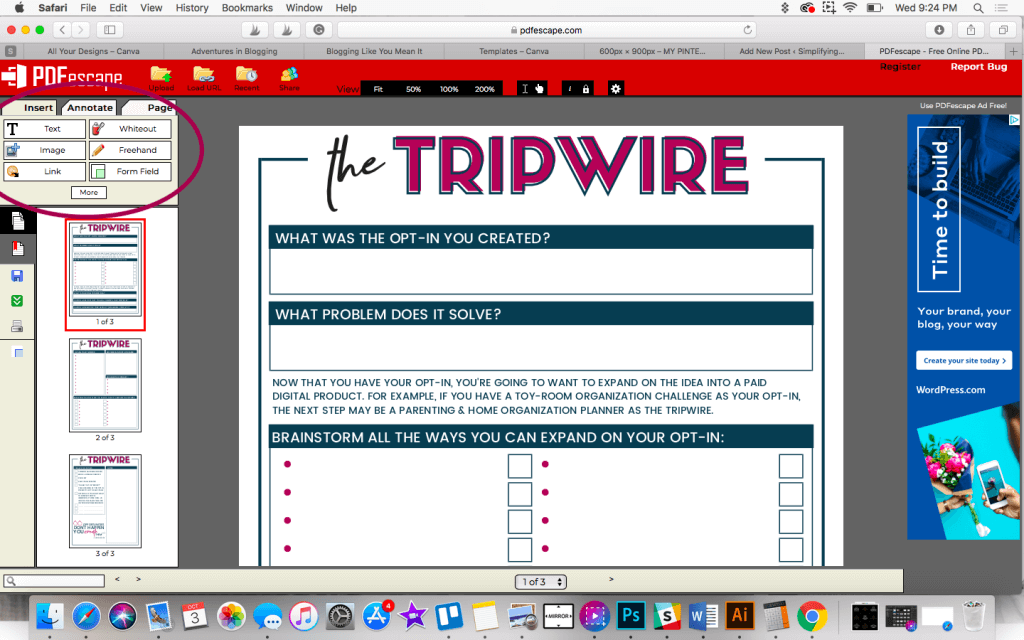
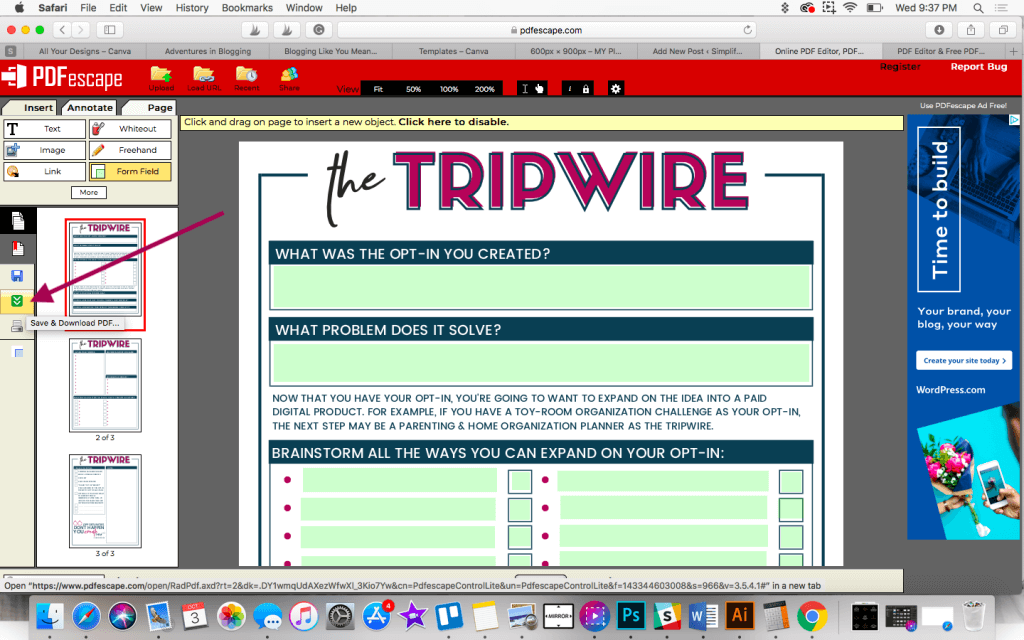
Once you’re on that website, go ahead and upload your PDF, as shown below.

Once it’s uploaded, your screen will look like the image below.
Notice the top left menu? That’s where you’ll find all your tools to create an editable PDF!
STEP 2: ADD FORM FIELDS
The tool we’ll use is called “Form Field”. You’ll be able to select various types of forms, including:
- Text
- Text paragraph
- Checkbox
- Radio
- Dropdown
- Listbox
- Reset button
- Submit button
For most editable printables, you’ll use the ‘Text’, ‘Text Paragraph’, and ‘Checkbox’ fields.
Choose the one you want and use your mouse to click and drag in the appropriate space to create the editable area on the printable.
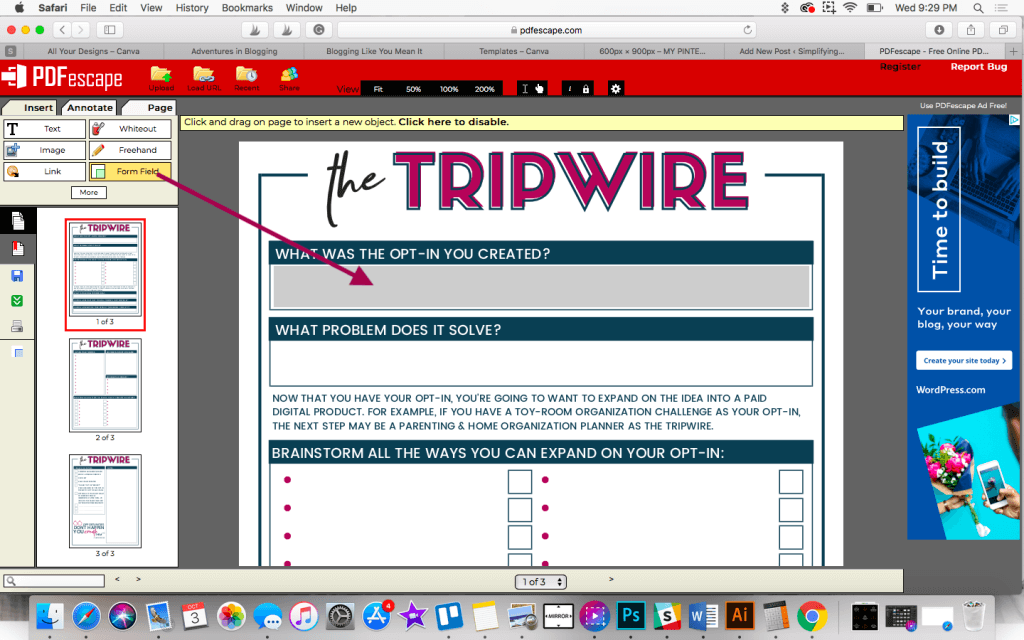
You’ll need to repeat that process for every area that you want someone to be able to type in. For example, we’ll repeat this step twice, referencing the printable above.
- Once in the blank space under ‘What was the opt-in you created?’
- And the second under ‘What problem does it solve?’
You don’t have to reselect the ‘Form Field’ button unless you change the form field type.
For this example, the top two areas are ‘Text Paragraph.’ Then we changed the ‘Form Field’ to ‘Text’ and did each bullet point under ‘Brainstorm all the ways you can expand on your opt-in.’
The areas don’t have to be perfectly sized; the green (as shown below) will not appear when you download your editable PDF.
STEP 3: ADD CHECKBOXES
Next, we changed the ‘Form Field’ to ‘Checkbox’ and filled in all our checkboxes.
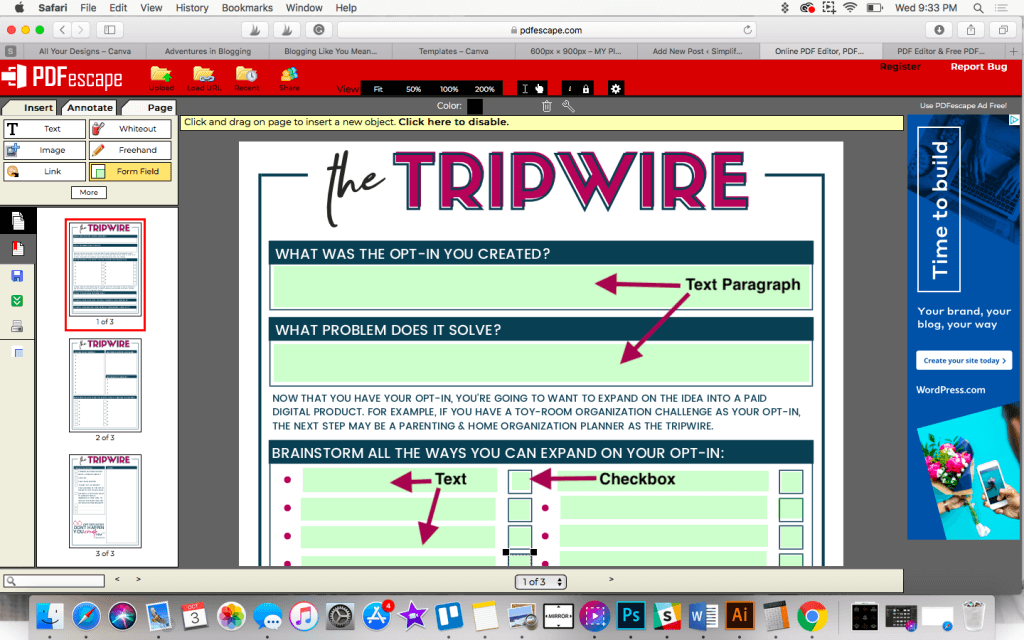
Remember, each area you’ve completed will turn green while using PDFescape but will revert to the original color (in this case, white) when you download.
STEP 4: DOWNLOAD YOUR EDITABLE PDF
Now that we have all our edits in place, we’ll click ‘Save & Download PDF’ because we’re done!
Your printable is now an editable PDF that can be used right away. Text boxes can be typed in, and checkboxes can be checked with just a click of a button.
Pretty cool, right?
Whether you have worksheets, planners, chore charts, or budget sheets, an editable PDF offers endless possibilities!
You can get super creative with this, and your readers will be able to edit it with ease!
If you love creating printables and want to learn more about how Canva can help you design better printables (and faster, too!), you’re going to LOVE our complete Canva course, Confidently Canva!
It’s EVERYTHING you need to know to feel completely confident in your designs because now you truly understand the tool you’re using and the design concepts involved.
Enroll now and get $20 off Confidently Canva today!
Don’t forget to keep the original and converted PDFs in your Google Drive, Dropbox, etc., for safekeeping.
You never know when one of your readers will run into a tech issue, especially those operating on older computers.
Now that you know how to make a PDF editable, we’ve included some additional how-to resources that we think might interest you.
RELATED RESOURCES:
- How to Use Worksheets to Grow Your Email List
- How to Make a Killer Blog Printable Using Canva
- How to Sell Your Printable Products the Easy Way
- How to Easily Design a Workbook in Canva
Don’t forget to grab our FREE Lead Magnet Template Pack! These fully editable Canva templates will help you create lead magnets that build trust so they’re ready to buy!
TRY CANVA PRO FREE FOR 30 DAYS
Start your FREE Canva Pro trial today and unlock ALL of their incredible time-saving features that’ll cut your design time to just minutes.
To be honest? It’s the best $14.99/mo OR $119/yr we spend on our business because that time we save with every single design is put back into making MORE money in our business!

Stephanie says
This is so awesome! Thanks for sharing. I was looking for something like this a while back. I will keep this in mind for my next lead magnet.
karafidd says
I’m glad you liked it! Thanks!
Renee says
Thank you so much!!! I have been searching for this information for so long.
karafidd says
I’m glad it was helpful!! <3
Amber says
I have been dreading learning how to do this, and have taken the easy route by just selling uneditable printables in my Etsy shop. But I realized I need to keep up with the times, lol. I’m SO GLAD I found this article. You broke this down into super easy steps, which I went and tried with one of my worksheets right away. You are awesome!! Thank you so much!
karafidd says
Thank you so much!! I’m so glad it helped!!! <3
Jelica says
Oh my goodness! This is exactly what I was looking for – thanks for sharing!
karafidd says
I’m so glad to hear that! Thanks Jelica!
Emilee says
Thank you so much for sharing! This is exactly the information I was looking for!
karafidd says
Yay! I’m glad it was helpful! Thank you Emilee 🙂
Maira Vial says
Wow! This is Fantastic! I’m so glad I came across this blog through EBA. I will definitely be using this tool. Thank you so much for sharing.
karafidd says
You’re so welcome! Glad you enjoyed it!
Kristi Dee | Helping Mompreneurs Master Productivity says
Thank you so much, Kara! You have no idea how much time you save me and how much knowledge you give every time you post. And all for free. You’re amazing!
karafidd says
That’s so nice Kristi! Thank you so much, happy I can help <3
Jamie Wilson-Houghtalen says
I agree with this. I’m in the car with my husband while I’m reading this post and I’m telling him how blown away I am by the info you give away for free. It’s seriously incredible. I’m so thankful for you!
karafidd says
That’s so sweet! Thank you!!