Workbooks are so popular because they’re great as a lead magnet or paid digital product. Check out this full tutorial on how to design a workbook in Canva (the easy way) and start growing your email list!
Ready to design a workbook AND launch it? Get our FREE Product Creators QuickStart Kit today! You’ll get a checklist, cheatsheet, and Canva design template to help you nail your launch!
It’s no secret product creation is where it’s at! It’s a one-and-done thing (for the most part), and it brings in consistent revenue month after month.
But it’s way easier said than done.
Ever wonder how so many people are able to create a jaw-dropping Canva workbook? Or, how do they make them at all?
Well, product creation is one of the things we cannot get enough of. It’s our jam, and we’re fine with that because we get to show you exactly how you can do it, too!
The very first workbook we designed was for a client with a VERY large audience. This was before we realized the power of digital products!
She created a very long, 60+ page workbook, and she totally rocked the launch.
REMEMBER THIS POST LATER! PIN IT TO YOUR FAVORITE PINTEREST BOARD! ⬇
Now, we were a bit nervous. We had just started dusting off our graphic design skills; all we had to work with was Canva.
It probably took us over a month to design a workbook between the design, the edits, the testing of usability, even more edits, etc.
But our jaws almost hit the floor when we read her income reports shortly after. Want to take a guess at what they were?
She generated 6 figures from this workbook in the 3 months after the launch. WOW! She seriously rocked it!
WHY DESIGN A WORKBOOK IN CANVA?
It has been said before, and we’re going to say it again: Product creation is a MUST if you want to go from blog to business.
Workbooks, ebooks, courses—you name it. Product creation is the best way to monetize your blog and earn recurring income.
Here are some key points to remember:
- Have a solid audience in place to survey and find out what they want and need
- Determine the best learning method, whether writing (workbook), watching (video), etc.
- Don’t just launch it and let it go – Turn it into a tripwire or add an email funnel so it’s still making you money after the launch
SIDE NOTE: Our FREE Product Creators QuickStart Kit will list out all the things you need to do before launching a digital product!
So today, we wanted to do a tutorial about creating a product (specifically, a workbook). The thing is, we know this is kind of a “giving too much away for free” type of video, but we don’t really care.
We started this site to help you learn, and that’s what we will do.
Here are the nuts and bolts of it: (make sure to watch the video at the top to see how it’s done!)
START WITH A COVER DESIGN
Whether we like it or not, people judge a book by its cover. Your cover design should be used in product mockups for Pinterest, social media posts, landing pages, the works.
You’ll use it to promote your workbook because it gives your audience an idea of what they’ll get in exchange for an email or credit card.
Related Post: How to Create a Product Mockup Template in Canva
With that said, your workbook cover design needs to be strategically thought out.
It’s the difference between your reader saying, “YES, I need this!” and “Not even worth my email address.”
- Busy covers create overwhelm, so keep it simple – white space is your friend
- They say, “don’t judge a book by its cover,” but people do it literally all the time
- Minimal is best, even if you have a colorful, busy brand like ours, so keep it professional and clean
- Stick with your brand colors and fonts to maintain brand consistency
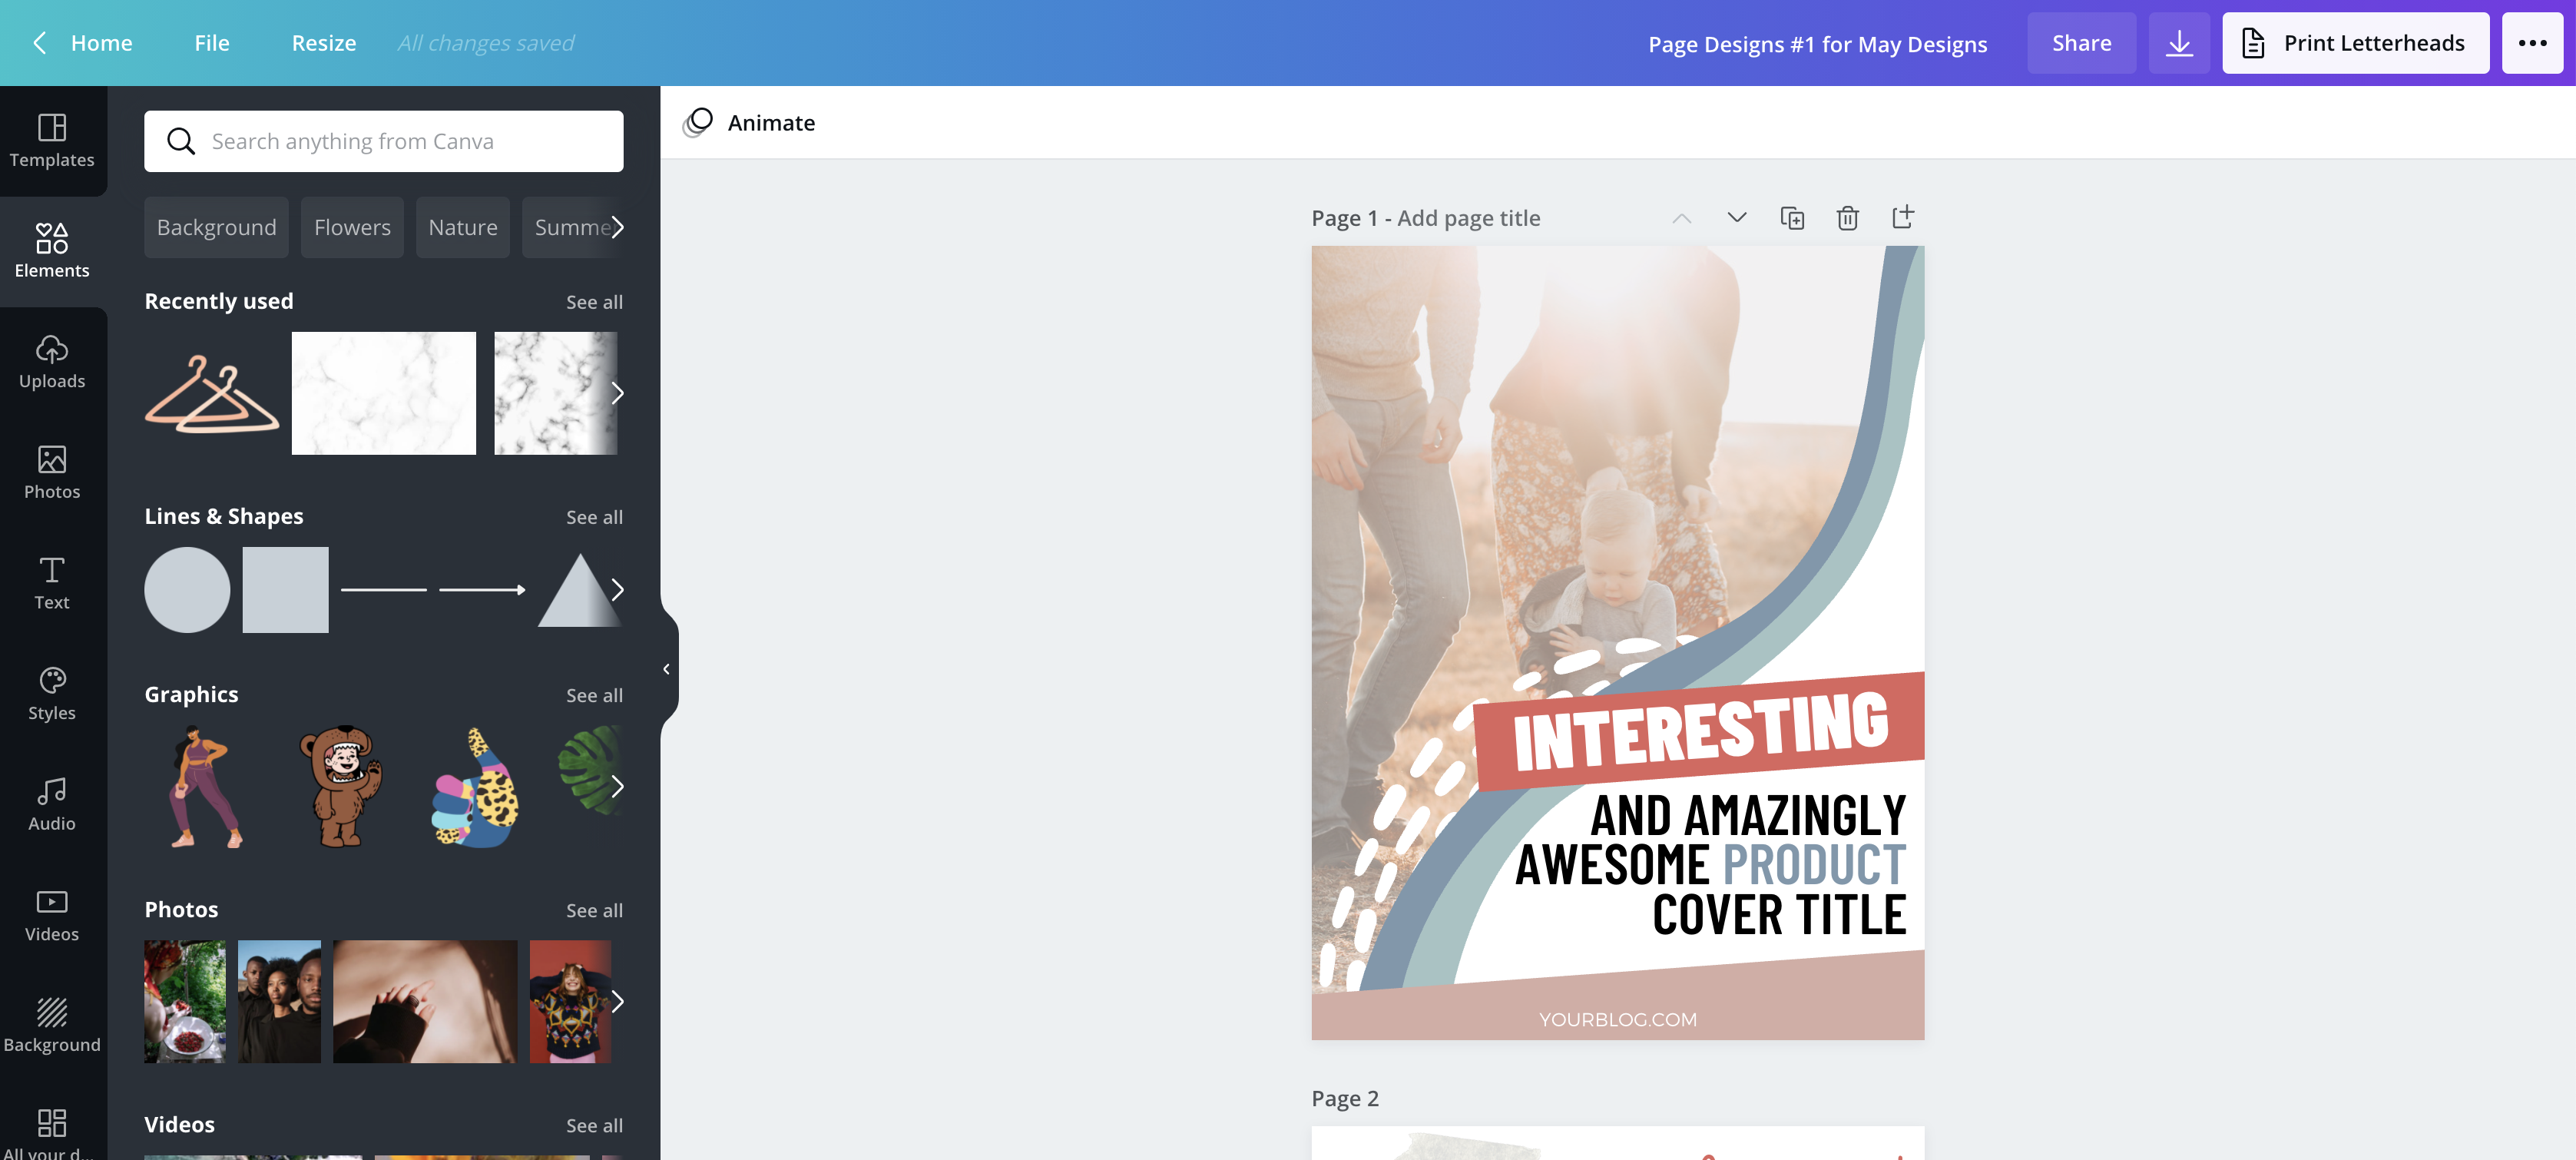
When you design a workbook or other digital product, it’s important to choose the style that you want to carry throughout the workbook.
Remember, to keep your Canva workbook’s look consistent with your brand for a more organized and cohesive feel.
Related Post: How to Brand Your Blog | Achieve Brand Consistency
When we design a workbook, we often start by outlining all our sections and what is going on in those sections. This is helpful when it’s time to plan the layout of each page.
You can do this in something like Google Docs or whatever program you use for your content creation.
Use the same layout and style throughout the book and decide whether to add page numbers.
For example, planners may not need page numbers because people might print multiple copies of one page.
Workbooks may need page numbers because the order is important. What if someone prints it, and the pages get out of order? Instant frustration!
If the thought of designing a workbook from scratch has you sweating bullets, not to worry, friend. Our Canva workbook templates in the Design Shop offer the perfect solution to blank page paralysis.
Just swap out your colors, fonts (optional), and text. That’s it!
We also cover in-depth how to design your very own printables in our COMPLETE Canva course, Confidently Canva!
You’ll learn everything there is to know about Canva so you can feel completely confident in your designs because now you truly understand the tool you’re using and the design concepts involved.
Enroll now and get $20 off Confidently Canva today!
START CREATING YOUR WORKBOOK LAYOUT DESIGN
After you add your border, header, and any subtitles you might have, it’s time to start laying it out.
As we said, we generally try to map this out on a large piece of paper prior to putting it on the screen. Be sure to use a pencil for this step because you may need to erase and adjust as you go.
It’s much easier to determine how things are positioned on paper rather than on the screen.
We’re a big-picture type of group!
You can use shapes to create a writing space for people to ask questions. You can also use bullet points or checkboxes to help organize the space your potential customers will fill out.
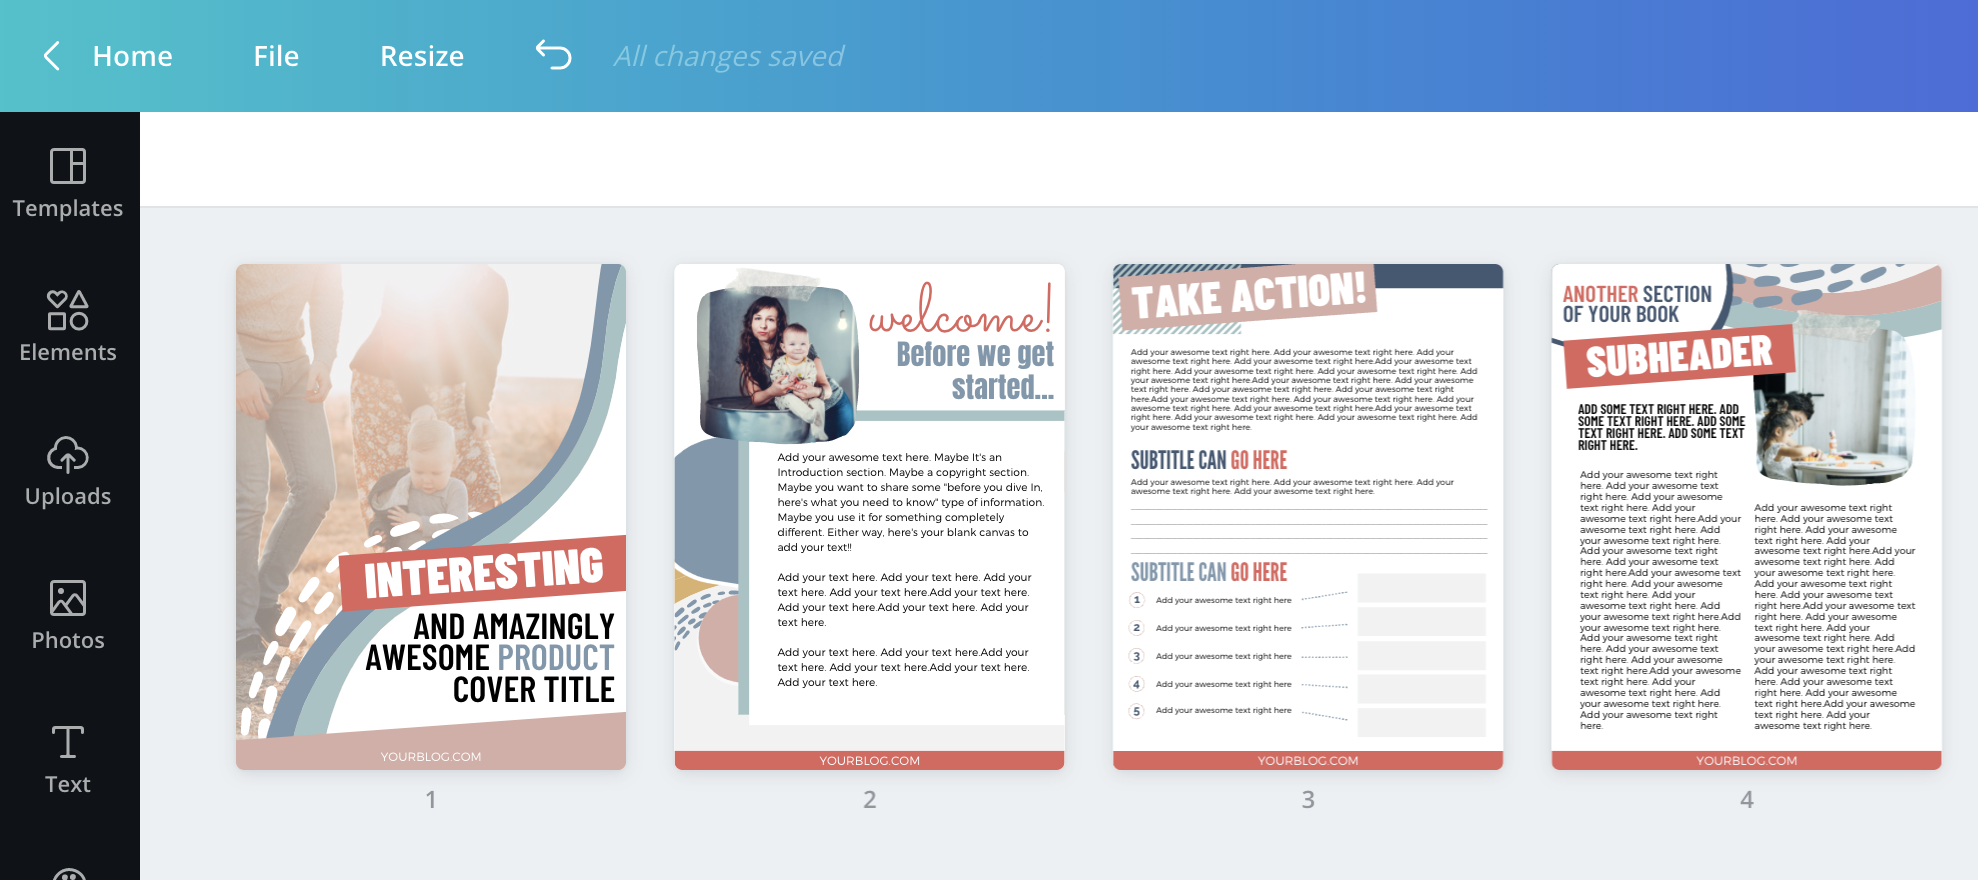
Here are a few examples of some VERY different page layouts we’ve created over the years.


Since the start of Simplifying DIY Design, we have created over 100 Canva workbook designs, and we can confidently say there is no right or wrong design layout.
It depends on what your workbook will teach your audience and their particular learning style.
If your Canva workbook has check or text boxes, we recommend converting it into an editable workbook.
Related Post: The Easiest Way to Create an Editable Printable for Your Readers
That way, your readers can fill it out, whether printed or kept digital. Little convenient details like this will continue to build trust and credibility with your audience.
CREATE A FUNNEL WITH YOUR CANVA WORKBOOK
Did you notice the QR code on the last page of our workbook template shown above?
That little element bridges the gap between products, thus creating a funnel.
Have you ever…
- Bought a product (whether it’s a workbook, course, etc.) from a brand you trust
- Implement the steps taught in the product
- Want to continue the learning process but don’t know which product to buy next?
This has happened to us so many times, and we found it to be a bit frustrating.
We created every product in our Design Shop to build on one another. But we noticed an influx of emails all saying the same thing.
“I have (product XYZ) but don’t know which product to buy next!”
Now, let us preface that we do NOT mind chatting with our readers via email and Messenger.
But can you imagine the number of readers who are NOT emailing and messaging us who have this same question? That’s sales we’re missing out on!
To remedy this situation, add a QR code to your workbooks, printables, ebooks, etc., to continue your product funnel.
Related Post: Simple Design Hack – How to Use QR Codes for Easy Money
When your reader scans the code, they’ll know the next product you recommend. Send them to a sales page, checkout page, or even something as simple as a blog post that you have monetized.
All in all, workbooks are a great lead magnet or even paid digital product. You can design a workbook from scratch or use a design template to make the creation process even easier (and faster).
And don’t stress; there isn’t a right or wrong way to design a workbook! You’ve got this, friend.
If you have questions on how to copy and paste in Canva, merge Canva designs, Canva keyboard shortcuts, and exceed the 300-page limit, check out our top 7 Canva design tips!
RESOURCES MENTIONED IN THIS POST:
- FREE Product Creators QuickStart Kit
- How to Create a Product Mockup Template in Canva
- Confidently Canva
- How to Brand Your Blog | Achieve Brand Consistency
- The Easiest Way to Create an Editable Printable for Your Readers
- Simple Design Hack – How to Use QR Codes for Easy Money
Don’t forget our FREE Product Creators Quickstart Kit! You’ll get a checklist, cheatsheet, and Canva design template to help you nail your launch!
TRY CANVA PRO FREE FOR 30 DAYS
Start your FREE Canva Pro trial today and unlock ALL of their incredible time-saving features that’ll cut your design time down to just minutes.
To be honest? It’s the best $14.99/mo OR $119/yr we spend on our business because that time we save with every single design is put back into making MORE money in our business!
WANT TO SAVE THIS FOR LATER? PIN IT TO YOUR FAVORITE PINTEREST BOARD!⬇


Lilian says
Thanks for sharing, it was exactly what I needed