As bloggers, we’re always looking for ways to do things just a little bit faster. These must-know Canva shortcuts will help you design in less time so you can get back to growing your blog!
There’s a saying here at Simplifying DIY Design that we remind ourselves of from time to time… procrastination is the thief of time.
It’s true. As moms, wives, and entrepreneurs, we tend to run low on extra time. So when we have a few minutes, we must make them count.
Unfortunately, we sometimes let procrastination creep in. When we do, we know we’re doing ourselves a huge disservice regardless of how we feel in the moment.
But, on VERY rare occasions, we consider something else a thief of time: Canva. And judging by the emails we get from our readers, we’re not alone!
Want a FREE, no-fluff crash course on how to use Canva as a blogger? Enroll in our self-paced Canva 2.0 Quick Start NOW to dive in!
Sometimes it’s slow, glitchy, or just doesn’t work right. We’ve noticed it happens more when using newly introduced features, too. Even the search function won’t give us the results we’re looking for.
Now, we just want to preface this by saying that we LOVE Canva. It’s an incredible tool, especially for bloggers and people who need to rock graphic design but don’t have time to master Adobe or take design classes.
It’s an internet-based design program, so while that is a blessing (work from ANYWHERE and ANY computer), it can also be a curse. I.e., server overload.
Our love for Canva will always outweigh any frustration.
Because of its easy-to-use design interface, the fact that it doesn’t take up gigs of space on our computers, and how it truly cares for its users, it’ll always be our most loved design tool.
Most of the frustration we experienced early on was totally our fault—we did not really know the tips and tricks to use Canva efficiently.
REMEMBER THIS POST LATER! PIN IT TO YOUR FAVORITE PINTEREST BOARD! ⬇
And to be honest, the frustration from our readers is caused by the very same thing, which is why we want to help give you your time back and feel Canva-confident!
We’re sharing some favorite time-saving Canva shortcuts that helped curb our frustration as we learned more about this awesome design tool throughout the years.
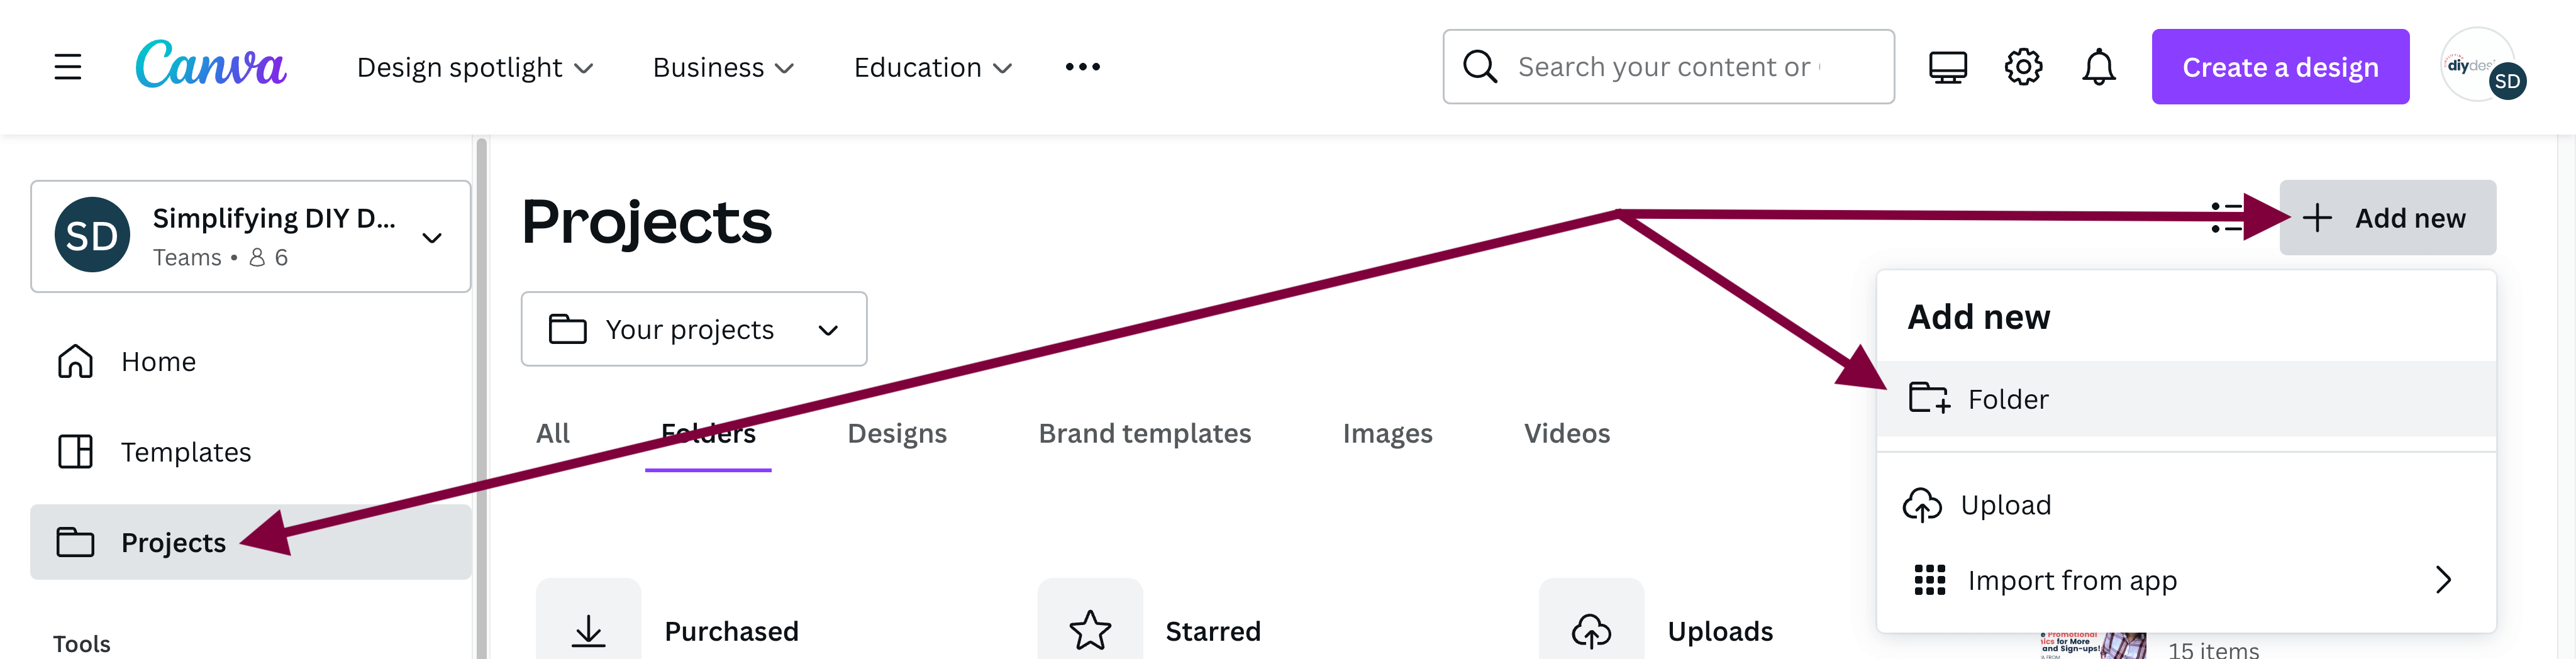
MAKE FOLDERS
Cutting down on excess time has a lot to do with organization. If your designs are scattered about without any form of structure, you could be wasting precious time searching instead of designing.
Our Canva folder system is organized based on products, summits, brand assets, clipart, stock photos, etc.
Whether we’re searching for our Teachable course covers or product mockups, it’s always just a few clicks away.
And now you can have UNLIMITED folders whether you’re using Canva for free or have a Pro account. (Prior to 2022, free users were limited to only two folders.)
Try out Canva Pro FREE for 30 days and see why it was one of the best investments we’ve made in our business!
We get quite a few questions on how exactly to organize your Canva folder system, so here’s an example of how we organize our products.
One of our main folders is titled ‘[PRODUCTS].’ Within that folder are individual products. Click on any of those product folders, and you’ll find ‘[PROMO],’ ‘[TEMPLATES],’ ‘[SLIDES],’ etc.
Anything that pertains to that product is housed within that folder. This is especially helpful for outsourcing and even more so for those who bill by the hour.
CANVA SHORTCUT TIP: ‘Star’ your most used folders (click the three horizontal dots to the right) to add them to your sidebar for easy access
Related Post: Awesome Canva Tricks Every Blogger Should Know
While this may not seem like a Canva shortcut to some, it’s been a complete game-changer for a lot of bloggers!
For example, when you’re looking for that Pinterest template, all it takes is a click instead of 15 minutes of scrolling. You’ll be glad you took the time to make that folder!
COMPLETE YOUR BRAND KIT
Brand Kits are available for Canva Pro users only. But don’t worry; you can try Canva Pro free for 30 days!
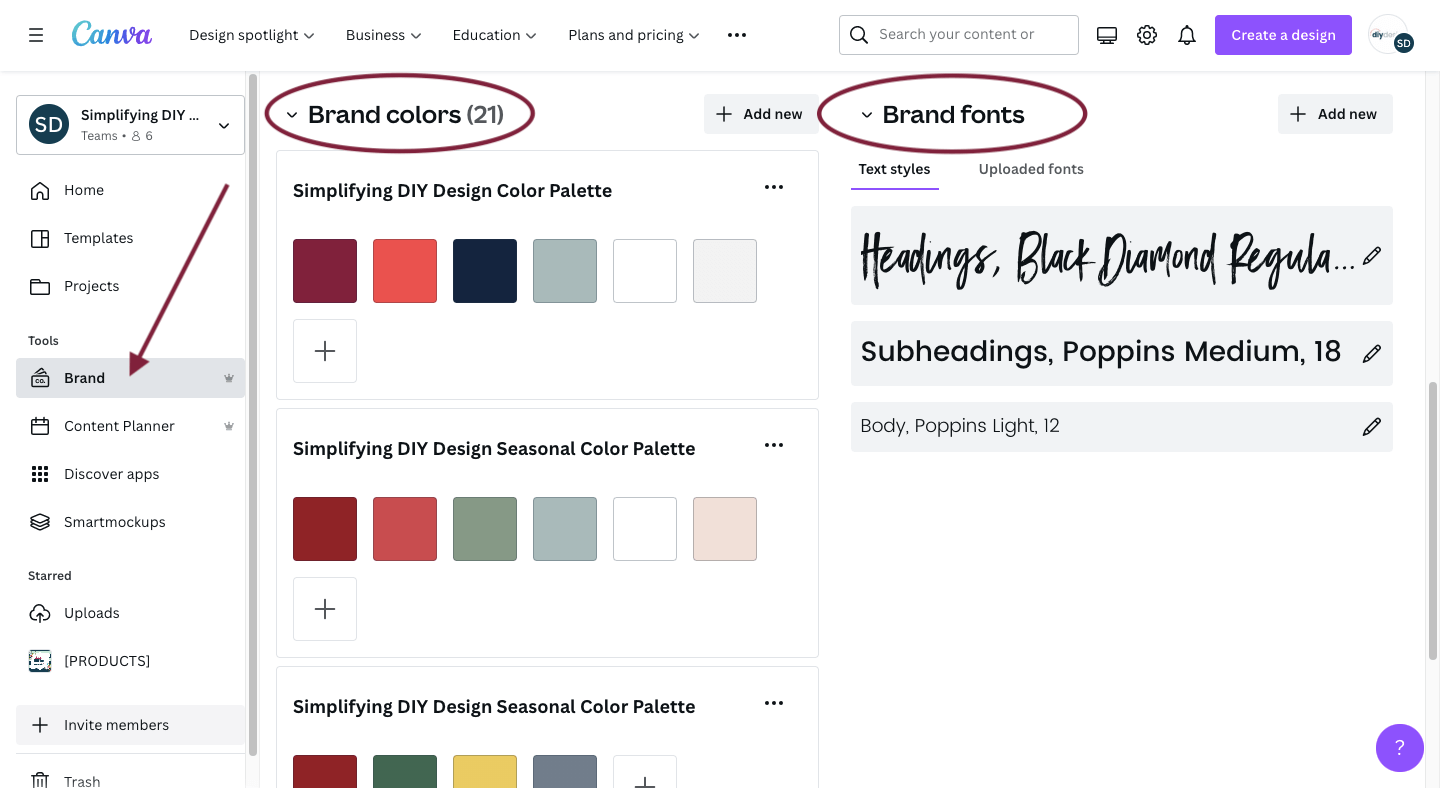
Your Brand Kit will house your brand color palette, seasonal color palettes (which we love!), brand fonts, logos, brand templates, and more.
Just click on ‘Brand’ from the left menu to add your ‘Brand logos,’ ‘Brand colors,’ and ‘Brand fonts.’ It’s that simple!
A benefit of your Canva Brand Kit is that it’s quick and easy to brand your designs.
Hit the ‘Text’ tool to instantly add your brand fonts. Click on the color box to easily access your palettes. Add a logo with just a couple of clicks.
This is especially helpful instead of endlessly scrolling through your ‘Uploads’ to find your logo!
Related Post: How to Set Up Your Brand Kit for Maximum Efficiency
Honestly, this is just a fraction of what your Brand Kit can do to help save you time.
In terms of the most used, this is our favorite Canva shortcut by far. However, again, you need to upgrade to Canva Pro in order to use this feature. Try Canva Pro free for 30 days here!
Just being able to maintain brand consistency is HUGE. But the fact that:
- Our colors are just a click away versus adding the hex codes every single time
- We’re able to use our brand fonts, so our designs are instantly recognizable
- We have dedicated ‘Brand Templates’ to design even faster
We’ll never stop recommending Canva to any and all bloggers. It’s that awesome!
KEYBOARD SHORTCUTS
Canva’s keyboard shortcuts took a little while to get used to. Okay, not used to it, but remember. It seems like every program has its own form of keyboard shortcuts, right?
Asana, Apple products, Canva… it can be a lot. But after about a week, we had them down pat!
Some commonly used Canva keyboard shortcuts include:
- Hold ⌘ + -/+ to zoom in and out by 25%
- < / > to move elements ONE pixel
- Hold Shift + select or deselect elements (you can also click + drag over to select)
- Alternatively, hold ⌘ + select elements BEHIND another element
- Hold Tab + T to create a new text box
- Hold ⌘ + ]/[ to move elements forward or backward
You can even ‘Tidy up’ your elements to space them evenly, horizontally or vertically, and align elements to the right, left, center, you name it!
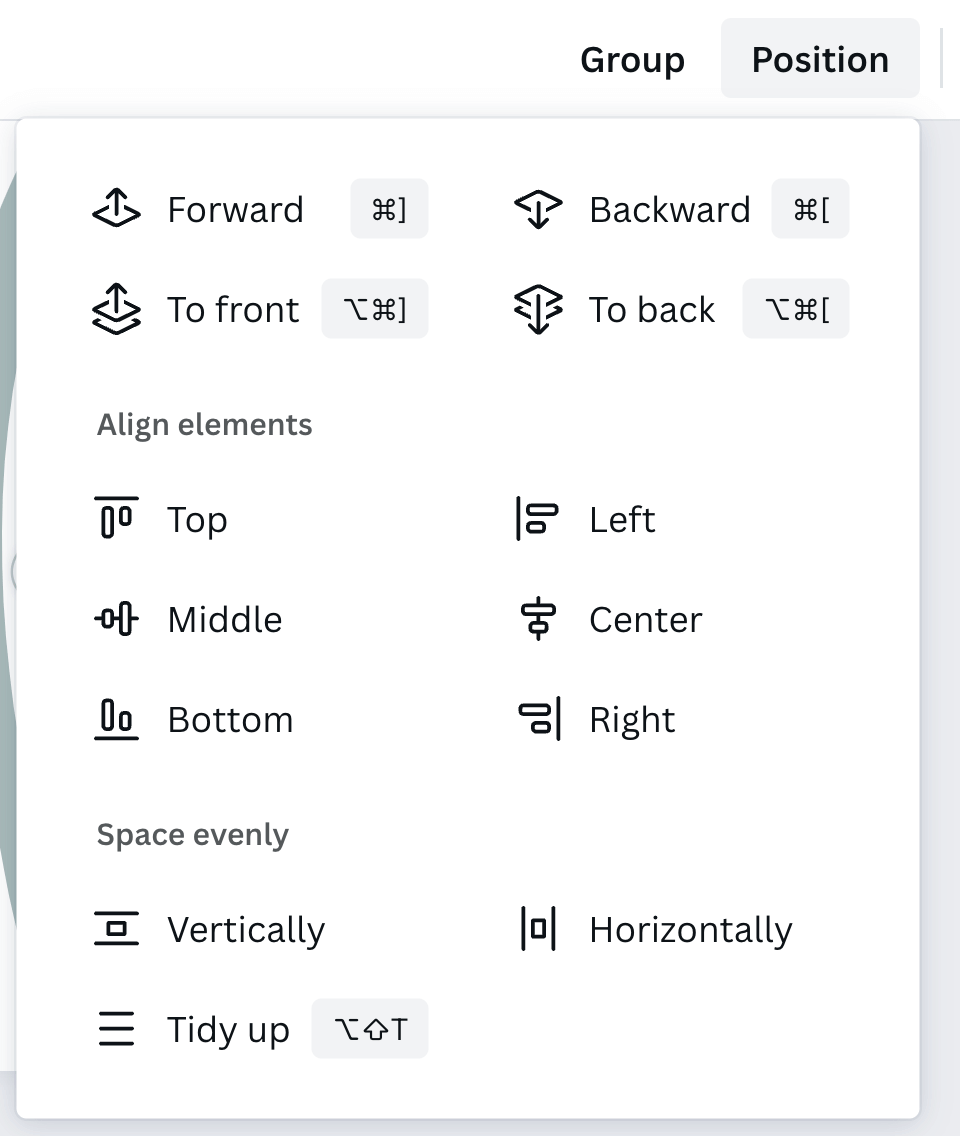
The ‘Tidy up’ feature is PERFECT for checkboxes and line items on checklists, worksheets, etc. We use it whenever we design printables for our blog.
It’s so much faster selecting all of our elements, clicking ‘Position,’ and again on ‘Tidy up’ versus manually moving each individual element to where we think looks good.
Knowing how much time we spent on that before this feature came around makes us cringe.
Don’t forget the generic computer commands, too! Holding ⌘ + A selects text, C copies, V pastes, B bolds, and I italicizes.
TROUBLESHOOT
Nothing is more of a time-suck than trying to figure something out when it’s just not working. The fact that it’s an internet-based program is both a blessing and a curse, but again, its glitches are VERY rare.
However, when those occasional hiccups come about, here are a few things we recommend:
SIDE NOTE: Remember to always save your work before trying any of the following, EVEN THOUGH Canva auto-saves
- Make sure you’re designing your project while zoomed in at 100%
- Reload the page
- Clear your cache
- Log out and back in
- Switch browsers
- Reboot your internet connection
- Just walk away and try again later
As we said, it’s an internet-based program, and sometimes, things happen on the backend that are completely out of our control.
UTILIZE COMMENTS
Have you ever been working on something and had to step away because of a phone call, the dogs need to let out, or your husband can’t find the ketchup from the fridge door even though it’s clearly staring him in the face?
Of course, you do; you’re human.
We love utilizing the ‘Comment’ feature on our Canva designs, so we know exactly where we left off if we have to step away for a little while.
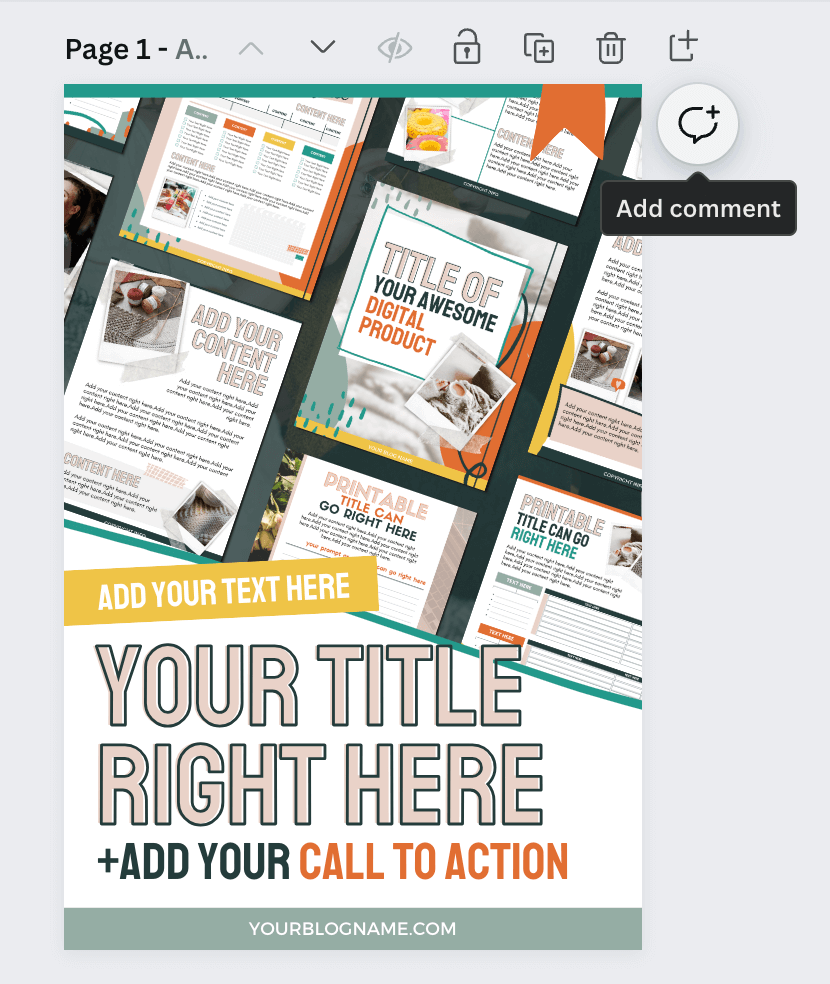
SIDE NOTE: This pin design is from our Mega Pinterest Template Bundle. Get 65+ done-for-you Canva Pinterest templates NOW for only $27!
We’ve even thrown in notes saying, “It’s missing something, but we’re not sure what,” or “Maybe try a different font combination, a little bold?” hoping that when we sit back down, it’ll spark that missing piece.
Again, this may not seem like a Canva shortcut.
But if you can jump right back into a design without wracking your brain around where you left off, that sounds like a time-saver for us!
Other ways to use this feature are for collaborations, communication within your design team, or as a design note for your users if you’re selling Canva templates.
If you love these Canva shortcuts and want to learn more about how Canva can grow your blog and business, you’re going to LOVE our complete Canva course, Confidently Canva!
It’s EVERYTHING you need to know to feel completely confident in your designs because now you truly understand the tool you’re using and the design concepts involved.
Enroll now and get $20 off Confidently Canva today!
These Canva shortcuts will save you time!
We’re firm believers in the “work smarter, not harder” mentality.
Knowing and practicing some efficient tricks can help save you time throughout your day and in your business overall (not to mention sanity).
We know you’re busy, and we truly believe you should be sporting a cape because you’re a rockstar super mompreneur (even if you don’t feel like it some days).
Your time matters. Make every second count!
RESOURCES MENTIONED IN THIS POST:
- Canva Pro (FREE 30-day trial)
- How to Easily Achieve Brand Consistency
- Confidently Canva (for $37!)
- Canva Tricks Every Blogger Should Know
- How to Set Up Your Brand Kit for Maximum Efficiency
Remember to enroll in our FREE self-paced Canva 2.0 Quick Start course! It’s perfect for learning what makes Canva the best design platform for bloggers!
TRY CANVA PRO FREE FOR 30 DAYS
Start your FREE Canva Pro trial today and unlock ALL of their incredible time-saving features that cut your design time to just minutes.
To be honest? It’s the best $14.99/mo OR $119/yr we spend on our business because that time we save with every design is put back into making MORE money in our business!
WANT TO SAVE THIS FOR LATER? PIN IT TO YOUR FAVORITE PINTEREST BOARD!⬇